
A Simple Household Routine That Improves Dryer Safety, Efficiency, and Peace of Mind
An Unexpected Lesson from Experience
The first time I was shown how to clean a clogged dryer vent, I approached the task with doubt. Like many people, I had always assumed that home maintenance required expensive equipment or professional assistance.
That assumption changed when my grandmother calmly explained that maintaining a dryer vent could be done with basic tools and careful attention. Her approach was practical, straightforward, and rooted in decades of personal experience.
She relied on only a vacuum cleaner, a long flexible brush, and an old leaf blower she had kept in the garage for years. With a steady smile, she reminded me, “This keeps your dryer running right, keeps your house safe, and costs next to nothing.”
At the time, the simplicity of her method seemed almost too good to be true. Over time, however, it became clear that her guidance was not only effective but also deeply important for household safety.
Why a Clogged Dryer Vent Is a Serious Concern
A clogged dryer vent is far more than a minor inconvenience. It represents a significant safety risk that often develops quietly and without visible warning.
According to the U.S. Fire Administration, clothes dryers cause nearly 2,900 house fires each year, and failure to clean the vent is the leading contributing factor.
Lint, dust, and debris accumulate inside the vent over time, creating a highly flammable environment exposed to heat during each drying cycle. These fires can begin silently, smoldering behind walls or in attic spaces before anyone becomes aware of the danger.
Beyond fire risk, lint buildup reduces airflow, forcing the dryer to work harder. This leads to increased energy consumption, longer drying times, and a shorter appliance lifespan.
In some cases, homeowners may also notice a faint burning smell that persists but goes largely ignored. This subtle sign often indicates restricted airflow and accumulated lint inside the vent system.
A Personal Reason for Caution
My grandmother’s dedication to this routine was shaped by experience. She had encountered a small fire decades earlier and never wanted anyone in the family to face a similar situation.
Her perspective transformed what might seem like a routine chore into a meaningful act of prevention. Cleaning the dryer vent was not optional in her household; it was a necessary measure to protect the home.
Over the years, her method proved to be simple, safe, and reliable. It also saved time and reduced unnecessary expenses while providing reassurance that the dryer was operating properly.
Step One: Prioritizing Safety
The first and most important step in the process is ensuring safety before beginning any cleaning. The dryer should be unplugged from its electrical outlet to eliminate the risk of accidental sparks.
If the dryer is gas-powered, the gas valve should be turned off as an additional precaution. This small action prevents potential leaks or hazards during maintenance.
Next, the dryer should be carefully moved away from the wall just enough to access the vent behind it. Creating a manageable working space allows for better visibility and reduces the risk of damaging the vent or the appliance.
This stage may seem minor, but it sets the foundation for a safe and efficient cleaning process. Moving slowly and deliberately helps prevent unnecessary strain on the vent connections.
Step Two: Removing Surface Lint with a Vacuum
Once access to the vent is secured, the visible lint and dust around the vent opening should be removed using a vacuum cleaner with a hose attachment. Even homes that regularly clean the lint trap often accumulate debris in the narrow gap behind the dryer.
This initial vacuuming clears loose material and prevents dust from spreading throughout the room during the deeper cleaning steps. It also provides a clearer view of the vent opening and surrounding area.
By addressing the outer buildup first, the cleaning process becomes more controlled and effective. It also reduces the chance of lint igniting in hidden areas behind the appliance.
Step Three: Using a Flexible Vent Brush
The flexible dryer vent brush plays a crucial role in reaching deeper sections of the duct. These brushes are designed to extend through the vent while bending and twisting along the interior walls.
Inserting the brush slowly while gently rotating it helps loosen lint and dust that cling to the inside of the duct. Patience is essential during this step to avoid damaging the vent or pushing debris further inward.
A careful brushing technique can dislodge years of accumulated lint and significantly restore airflow. Rushing the process or forcing the brush can create holes in the duct or compress debris deeper into the system.
Step Four: Vacuuming the Loosened Debris
After brushing, the vacuum should be used again to remove all loosened lint and dust near the vent opening. This combination of mechanical agitation and suction is far more effective than either method alone.
Removing the debris at this stage ensures that large clumps do not remain near the vent entrance. It also reduces the likelihood of lint being pushed back into the duct when the dryer is reconnected.
This step contributes to a cleaner and more efficient airflow path, which directly improves dryer performance.
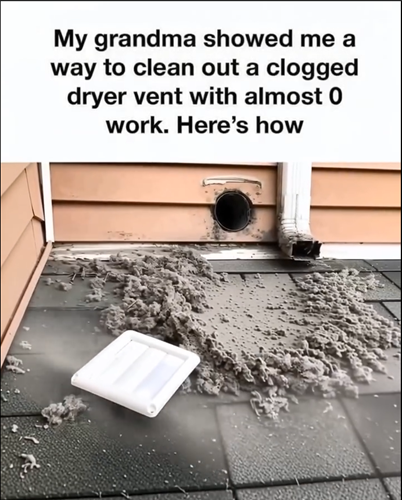
Step Five: Clearing the Vent from the Outside
The method becomes especially effective when addressing the vent from the exterior of the home. Most dryer vents terminate outside, typically covered by a vent cap secured with screws.
After removing the cover, the opening should be inspected for any nests, insects, or debris that may have accumulated. These obstructions are common and can further restrict airflow.
Using a leaf blower inserted into the vent opening allows strong bursts of air to push lint and dust outward. This action clears debris from deeper sections of the duct that brushing alone may not fully remove.
The result is immediate and visible, as accumulated material is expelled into the open air. This step restores airflow throughout the entire vent system rather than just near the appliance.
Step Six: Reassembling and Testing the Dryer
Once the vent is thoroughly cleared, the exterior cover should be reattached securely. The dryer can then be reconnected and carefully moved back into position.
Running a short cycle with a small load helps confirm that the cleaning was successful. During this test cycle, the exterior of the dryer should feel cooler and the operation should sound quieter.
Clothes often dry more evenly and quickly after the vent has been properly cleaned. Any lingering odors caused by lint and dust typically disappear as airflow improves.
Why This Method Is Highly Effective
This approach works well because it addresses lint buildup from multiple angles. Vacuuming removes surface debris, brushing loosens internal buildup, and airflow clears the remaining material from the duct.
Many people only clean the lint trap or lightly vacuum behind the dryer, leaving extensive sections of venting filled with flammable debris. By combining these steps, the entire vent system receives a more thorough cleaning.
Restored airflow allows the dryer to operate closer to its original efficiency. This reduces energy consumption, shortens drying times, and minimizes strain on the appliance’s internal components.
The financial benefits are also notable. A vent brush costs less than $20, and a leaf blower is a common household tool that serves multiple purposes beyond vent cleaning.
Compared with the cost of hiring a service technician, this method offers a cost-effective and practical solution that requires minimal investment.
The Broader Impact of Routine Maintenance
Regular dryer vent maintenance extends beyond technical performance. It reinforces the importance of consistent household care and attention to small details that prevent larger problems.
Tasks like vent cleaning are often postponed because they are out of sight and easy to overlook. However, neglect can lead to increased bills, reduced appliance lifespan, and serious safety hazards.
Establishing a seasonal routine helps ensure that lint does not accumulate to dangerous levels. Performing the process every spring and fall provides ongoing protection and maintains optimal dryer efficiency.
A Tradition Rooted in Care and Prevention
Learning this method became more than just a lesson in home maintenance. It was a demonstration of mindfulness, patience, and responsibility within the home.
The process itself carried a steady rhythm, reinforcing the idea that small preventive actions can avert significant risks. Over time, it evolved into a family tradition centered on safety and efficiency.
After performing the cleaning for the first time, the difference was immediately noticeable. The dryer functioned more smoothly, clothes dried faster, and the persistent burning smell that had lingered for years was gone.
Most importantly, there was a renewed sense of security knowing that a hidden fire risk had been significantly reduced.
A Practical Reminder for Homeowners
Routine household maintenance tasks are frequently underestimated until they become urgent concerns. A clogged dryer vent may appear insignificant, yet it can contribute to fire hazards, increased energy costs, and appliance wear.
Maintaining the vent system is a straightforward and effective way to enhance both safety and performance. It requires only basic tools, patience, and attention to detail.
This method also highlights the value of hands-on knowledge passed through generations. Practical skills learned over time often provide reliable solutions that remain effective despite technological advancements.
Final Thoughts on Safety and Efficiency
A clogged dryer vent is a silent hazard that can develop unnoticed over months or years. Regular cleaning reduces the risk of house fires, improves efficiency, and saves money in the long term.
The method outlined here demonstrates that simple tools and careful effort can produce meaningful results. Proper airflow, reduced lint buildup, and consistent maintenance contribute directly to a safer home environment.
For homeowners, parents, and anyone responsible for household upkeep, this routine represents a small investment of time with substantial benefits. It enhances appliance performance while providing reassurance that the home is better protected.
As the reminder often echoed during each cleaning session, “This keeps your dryer running right, keeps your house safe, and costs next to nothing.”
The message remains clear: consistent maintenance, even when simple, can prevent major problems and improve everyday life in practical and tangible ways.