
How to Make a Stylish DIY Reed Diffuser for a Naturally Fragrant Home
Creating a pleasant atmosphere at home does not require sprays, electrical devices, or open flames.
With only a handful of simple ingredients, you can craft an elegant reed diffuser that gently releases fragrance throughout the day.
This decorative solution offers continuous scent without overpowering the room.
It also gives you full control over both the aroma and its intensity.
A homemade reed diffuser is practical, customizable, and budget-friendly.
At the same time, it adds a refined decorative touch to shelves, tables, or entryways.
Why Making Your Own Room Fragrance Is Worth It
Preparing your own diffuser offers several clear advantages.
You decide exactly which scents go into your home environment.
You can avoid unnecessary artificial aerosols and excess additives.
The fragrance can easily be adjusted to match the season or your mood.
Homemade versions are typically much more affordable than branded store products.
In addition, the glass bottle with wooden sticks becomes a subtle decorative element.
The scent spreads evenly and softly rather than in sudden bursts.
This steady release makes the atmosphere feel calm and balanced.
How a Reed Diffuser Works
The mechanism behind a reed diffuser is simple and effective.
Wooden sticks made of bamboo or rattan act as narrow channels.
They draw the scented liquid upward through capillary action.
Once the liquid reaches the top of the sticks, it slowly evaporates into the air.
This creates a continuous and gentle fragrance without the need for heat or electricity.
The process happens gradually, which keeps the scent consistent rather than intense.
What You Need to Get Started
The ingredient list is short and straightforward.
You will need a small glass container or decorative bottle with a narrow opening.
Wooden sticks such as bamboo or rattan reeds are essential.
A carrier liquid is required to dilute and disperse the fragrance.
This can be alcohol, isopropyl alcohol, or a light base oil.
You will also need a fragrance of your choice, such as essential oils or a mild scent additive.
If desired, a small amount of water or coarse salt can be used for dilution.
The liquid mixture should remain thin enough for the sticks to absorb easily.
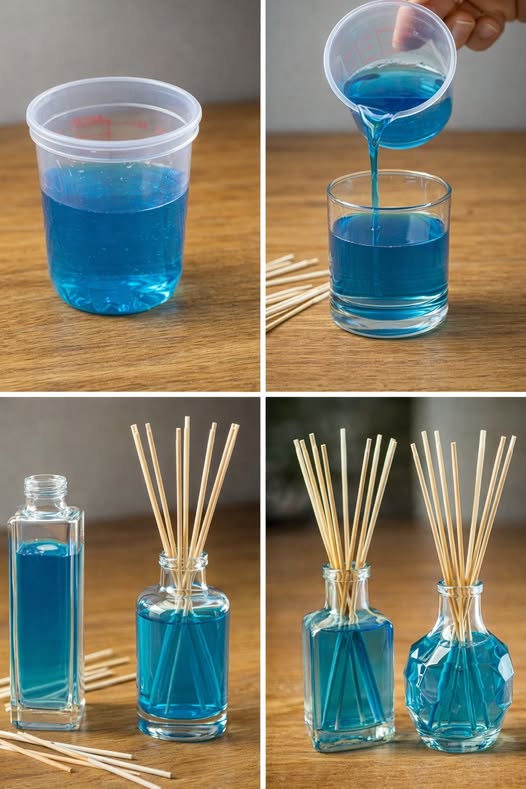
Step-by-Step Preparation
Begin by selecting a clean and completely dry glass container.
The opening should not be too wide, as this would cause faster evaporation.
Make sure the bottle stands securely and cannot tip over easily.
In a measuring cup, combine your chosen carrier liquid with the fragrance.
For example, alcohol can be blended with a few drops of essential oil.
Stir the mixture thoroughly to ensure the scent distributes evenly.
Carefully pour the prepared liquid into the bottle.
Insert the wooden sticks into the container.
Within a few hours, the sticks will absorb the liquid and begin releasing fragrance.
If you prefer a stronger aroma, turn the sticks over after a day.
You can also add additional sticks to increase intensity.
Controlling the Fragrance Strength
The intensity of the scent is easy to manage.
Using fewer sticks results in a lighter fragrance.
Adding more sticks increases the strength.
Turning the sticks regularly refreshes the scent release.
A smaller bottle with a narrow neck slows evaporation.
This allows you to tailor the diffuser to the room size and personal preference.
Subtle adjustments make a noticeable difference.
Choosing the Right Scents
Fragrance selection plays a major role in the overall atmosphere.
Citrus scents such as lemon, orange, or bergamot create a fresh and uplifting feel.
Lavender and vanilla are often chosen for a calming and relaxing effect.
Eucalyptus or mint contribute a clean and refreshing impression.
Spices like cinnamon and clove bring warmth and coziness.
Blending different oils allows you to create a unique, personalized aroma.
Seasonal adjustments can make your home feel dynamic and inviting.
Care and Maintenance
A homemade reed diffuser typically lasts from several days to a few weeks.
Duration depends on room temperature, humidity, and the type of liquid used.
When the fragrance weakens, there are simple ways to refresh it.
You can turn the sticks over to reactivate scent release.
Adding more prepared liquid helps restore intensity.
If needed, replace the mixture entirely for a renewed aroma.
Regular maintenance ensures consistent performance.
Important Safety Considerations
Place the diffuser out of reach of children and pets.
Do not use strongly irritating or toxic fragrance components.
Ensure the bottle remains stable and cannot easily spill.
Ventilate the room regularly to prevent the scent from becoming overwhelming.
If you are sensitive to fragrances, begin with a very mild mixture.
Gradual adjustment is safer than starting with a concentrated formula.
A Decorative and Practical Addition to Any Room
Beyond fragrance, a reed diffuser contributes to visual appeal.
A simple glass bottle paired with natural wooden sticks creates understated elegance.
The minimalist look blends well with modern and traditional interiors alike.
Because it requires no flames or devices, it remains both safe and convenient.
The diffuser works quietly in the background, enhancing the space without demanding attention.
It combines aesthetics with functionality in a subtle way.
The Lasting Appeal of DIY Fragrance
Making your own reed diffuser is a straightforward and creative project.
It allows you to control ingredients, scent strength, and presentation.
The process is simple, affordable, and adaptable.
With only a few materials and a bit of preparation, you can create a continuous room fragrance tailored to your preferences.
The result is a home that feels welcoming and balanced.
A handmade diffuser reflects personal taste while providing gentle, ongoing freshness.
In the end, this approach offers a practical and stylish way to enhance your living space naturally.