
When my grandmother first introduced me to her method for clearing a clogged dryer vent, I’ll admit, I was skeptical. No fancy tools, no costly service calls—just a vacuum, a brush, and an old leaf blower she had stored in the garage. She smiled at me with calm confidence and said, “This keeps your dryer running efficiently, protects your home, and costs almost nothing.” I quickly realized she wasn’t exaggerating.
Many homeowners don’t realize that a blocked dryer vent is more than a minor inconvenience—it’s a serious fire risk. Each year, clothes dryers are responsible for nearly 2,900 house fires, with clogged vents as the leading cause. Lint buildup doesn’t just threaten safety; it also reduces dryer efficiency, raises energy bills, and shortens the machine’s lifespan.
So when Grandma emphasized that this was a “must-do,” I paid close attention.
Her Step-by-Step Method — Safe, Easy, and Effective
Here’s the process she taught me, which I’ve followed ever since:
✅ Step 1: Prioritize Safety
Unplug the dryer. If it’s gas-powered, shut off the gas valve. Gently pull the machine away from the wall, enough to reach the back vent.
✅ Step 2: Vacuum the Vent Opening
Using a vacuum with a hose attachment, clean out any visible lint and dust around the back vent and nearby floor. You’ll often find more buildup than expected, even with regular lint trap cleaning.
✅ Step 3: Use a Flexible Vent Brush
Insert a long, flexible dryer vent brush into the duct. Twist and push it carefully to dislodge lint and debris clinging to the interior walls.
✅ Step 4: Vacuum Again
Return with the vacuum to remove the loosened lint and dust.
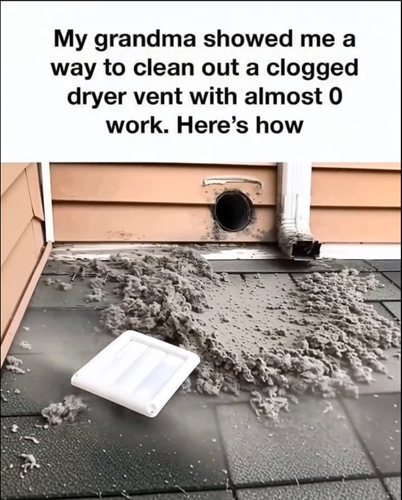
✅ Step 5: The Leaf Blower Hack
Here’s the clever twist: head outside to the vent’s exhaust point. Remove the vent cover, then insert the leaf blower nozzle. Give it several strong bursts, and watch as dust and lint shoot out. The results are immediately visible—and surprisingly satisfying.
✅ Step 6: Reassemble and Test
Replace the vent cover, reconnect the dryer, and slide it back into place. Run a short cycle with a small load. You should notice the dryer runs quieter, dries clothes faster, and the machine feels cooler to the touch.
After following this routine the first time, the difference was striking. The dryer worked like new, clothes dried more evenly, and the faint burning smell that had gone unnoticed was gone. Most importantly, the fire risk was significantly reduced.